Naturalist Notes: February in the Mountains

IMG_8229-792x597
Amos Almy looks out at Diablo Lake during sunset; all photos by Montana Napier

“No winter lasts forever, no spring skips its turn.” – Hal Borland

February is the beginning of my favorite stretch of year – the transition from winter into spring, and then spring into summer.

This winter I am finding myself drawn to the lowland forests and deciduous banks of the Skagit River. My time upriver has been the most wintery winter I’ve endured; I am now accustomed to the semi-regular process of scraping ice and snow off my windshield, and wearing microspikes as I walk down the icy road of the North Cascades Environmental Learning Center. However, a walk in the forest feels like a visit with an old friend. It reminds me of my island home at the other side of the watershed, Deception Pass. Everywhere in the forest, signs of familiar companions are appearing and talking and that makes my heart feel much warmer, though my toes and hands are just as cold.

These interactions have also filled my journal with many, flowery ramblings. In between classes, and now Mountain School trainings, I try to take a walk outside and note changes in my environment. February is especially a time of rapid change – one day it can be cool and damp out, and the next day there’s seven inches of snow on the ground and slush in my boots. Below, I’ve noted some of the changes witnessed within my little sphere of the world this past week. What have you noted, too?

Recent Naturalist Notes

On February 16 – I heard a Varied thrush (Ixoreus naevius) sing outside of my partner’s cabin in Marblemount, while branches cracked from the weight of freshly fallen snow.

February 17 – During a rainy walk in Rockport State Park, I found Indian plum (Oemleria cerasiformis), or osoberry, breaking leaf buds all along the Suak-Springs trail.

Also spotted were young buds on the Vine maple (Acer circinatum), leafy buds of the Salmonberry (Rubus spectabilis), and two of my favorite edibles popping up along the forest floor: Stinging nettle (Urtica dioica) and Siberian miner’s lettuce (Claytona sibirica). It’s only a matter of time until I can make a batch of nettle pesto!

And there were signs of moss reproduction everywhere, with the stalk-like shoots of the sporophyte popping up. The spore capsules are about ready to release spores that will grow into new moss. Next time, I will take my hand lens with me to get an even closer look.

On the drive home, I stopped at mileposts 100 and 101 to stand by the Skagit River. I saw three Bald eagles (Haliaeetus leucocephalus) at 101 and noticed the snow line on the mountains and grey clouds. It felt good to stand close to the talking river and listen to the eagles.

The Skagit River’s mood during the evening
Continue reading

Place-based Learning Course: Paddling the Skagit River

groupcanoetraining-e1508212699995-1024x682-1-792x597

In August, my cohort and I began our 7-quarter educational journey of earning our Master of Education degree. We are the 17th Cohort of students in the Graduate M.Ed Residency program through the North Cascades Institute and the Huxley College of the Environment at Western Washington University.

Before beginning our year-long residency at the Learning Center, we engage with the natural and cultural histories of the North Cascades region through field excursions. This intensive six-week course includes canoeing on the Skagit River, learning about local communities and sustainable agriculture, hiking in alpine areas, cohort community formation and a culminating 10-day wilderness backpacking experience. 

Below are pictures from the paddling portion of our Place-based Learning Field Course, along with excerpts from our group journal. Enjoy!

Big Canoe and Community – August 9, 2017:

“With a little less smoke in the sky, Cohort 17 loaded into the Salish Dancer for a paddling orientation to Diablo Lake and the surrounding area. Before the canoe left the dock, we heard and saw two peregrine falcons – the fastest member of the animal kingdom – amongst the rocky cliffs of Sourdough Mountain.

Continue reading

Wonderland Trail Thru-hike

Last summer I thru-hiked the Wonderland Trail in eight days during the shoulder season, and almost died. Maybe.

Now, it would have made sense to write my trail report um, last summer, but then I lost my journal for months before I found it in the most unpredictable place (think envelope within a kitchen drawer). Luckily the journal has been found, so now I must dive into the details of this incredible journey that everyone should do.

What the heck is the Wonderland Trail? It is a very scenic, 93 mile trail that circumnavigates the majestic Mount Rainier. In the span of a week, you see every “face” of the mountain and get a peek around every corner of the National Park. See?

And below is a picture of the Wonderland Trail’s elevation profile. What does it remind you of visually? To me it looks like a rollercoaster of thigh-burning hell. In fact, the trail challenges hikers with a strenuous 22,000 feet of elevation gain and loss.

Now, what makes this place so special and treacherous trail worth the pain? Easy answer – everything.

Exhibit A.

The Park (and mountain) is freakin’ gorgeous, and if you avoid the crowds at Paradise, you will find solitude in the backcountry. The Wonderland Trail in particular takes you through old-growth forests, right along the tongue of massive, breathtaking glaciers, through wildflower meadows, to the shores of alpine lakes and remote places where wildlife roam undisturbed. I fell in love with all the faces of Mount Rainier during my journey, and finished the Trail humbled by the unpredictable forces of nature. For more general info on the W.T., check out this resource.

This blog post series will be written in a journal-like fashion due to the contents origin – a trail journal. I’ve never shared anything like this before, so bear with me as I try something new. The events that happened on Trail were sometimes dramatic, and I hope will translate well in this form of storytelling. Without rambling on too much, let’s get started.

Day 1:

This morning Tina and I met outside of the Longmire WIC to solidify our trip itinerary. Tina is a leggy-woman with long blonde hair and a vibrant personality.  We don’t really know each other but are thru-hiking together. Last week, while sitting on the floor of the Paradise Visitor Center, I thought, “I wish I knew someone interested in hiking the Wonderland Trail with me.” Within a minute, Tina – one of Amos’ coworkers – approached me and asked if I was interested in hiking the W.T. with her. We’d only met once before. I said yes, of course.

Now I’m laying beside her in a two-person tent; life is funny that way. Today we hiked from Longmire to Nickel Creek with another one of Amos’ coworkers, Lindsey, and her friend Tyler. That’s a solid 14.6 miles with 3,000 ft of elevation gain. We started at 9am and made it to camp at 5 o’clock on the dot. A lot of uphill but tomorrow is supposed to be even more intense! And more beautiful.

A third coworker of Amos, Claire, showed up around 7pm after we’d all eaten dinner. My dinner was delicious, and a first – mac and cheese with cajun seasoning. Mmhmm. It’s the little things. I just got back from a .2 mile hike to Nickel Creek to fill up my “dirty” bag to filter water in the morning. It’s fun to fall back into old patterns such as water management and the tedious process of filtering everything you drink. After the A.T., I remember being amazed by the convenience of tap water. You just turn a handle and then you have beautiful, purified water ready to go (ideally)!  Now I’m enjoying the slow process of hauling two liters back to my site, and the mindful walk alone in the darkening forest.

Continue reading

Trip Report: Snowshoe at Katahdin Woods and Waters

Recently Amos, Graham, Isaac and I snowshoed to a winter hut in Katahdin Woods and Waters National Monument. We were in Maine for the holidays, and the guys like to do a winter trip when they’re all together. This year I was the tag-along-girlfriend, also know as Chris’ replacement (I don’t know who he is…).

OLYMPUS DIGITAL CAMERA
#attentionseeker – P.C. Amos Almy

Amos chose Katahdin Woods and Waters over Baxter State Park because, at the time, it was our country’s newest national monument and he wanted to check it out. We had followed the Park’s story in the news and sided with Roxanne Quimby, a founder of Burt’s Bees, and President Obama in wanting to protect the land for future generations to enjoy. The idea of exploring this newly acquired, federal land was appealing.

So he reserved the Big Spring Brook winter hut via email, and we prepared for our 14mi round trip in the dead of a Maine winter. Did it matter that the projected temps were 10-15f, overcast, and maybe snow/rain? Nah.

Continue reading

Insight on a Frugal Thru-hike

This post is a compilation of random tips, tricks, and gear advice that we believe is worth sharing to potential Appalachian Trail thru-hikers–or long-distance backpackers–who are on a budget. It’s the kind of stuff that Lucas and I wish we knew ahead of time.

In total, we spent about $3,000 each (gear included).

Hitch-hike, but be smart about it.

1000976_455761034556793_1019987351_n

Lookin’ completely hiker-ish with a purpose, aka not threatening to strangers.

We stuck out our grimy thumbs at passing trucks from the get-go; since Lucas had already hitched around Europe, there was no hesitation. In the beginning, many hikers called up taxis or shuttles to pick them up. Up until Harper’s Ferry, the unofficial halfway point, we still witnessed people calling up taxis. That cost adds up!

  • Most locals near the trail are aware of thru-hikers. They know that you need to resupply in town and want to help/like someone to talk to.
  • If the driver doesn’t ask where you’re headed to within 30 seconds of saying hello, looks at you in a way that makes you uncomfortable, or has an open beer can in their hand, don’t get into the car.
  • Try not to hitch alone, especially if you’re female.
  • You are absolutely allowed to turn people down! Make up an excuse. Say you forgot something, or that you’re actually waiting for a friend.
  • Stand by the road in a place where a car can easily pull-off.
  • Take note if hitching is illegal in the area.
  • Make fun signs like a big thumb, smile, or dance.
  • Go to grocery stores. People will ask if you need a ride back to the A.T.
  • If desperate, approach drivers at gas stations. Tell them your story.

Unless it’s a jacket or shoes, don’t worry about hiking-specific clothing.

Rockin' the hand-me-down hat and thrift store tank.

Rockin’ the hand-me-down hat and thrift store tank.

Instead, simply think synthetics and comfort. We both started with polyester shirts from Target, which we threw away after 700 miles and replaced them with thrift store shirts.

  • Synthetics hold smell, bad. Even if you buy a name brand shirt, it’ll eventually smell like cat urine, so why not recycle shirts and support local businesses for $2?
  • I sent my pants home early on and wore my long underwear under my shorts. It’s less weight, plus you have all the pockets you need.
  • Check hiker boxes for gloves, hats, and even boots.

Why pay to sleep somewhere when you can sleep in the woods for free?

10372103_481282505337979_5112064799053868403_n

The morning after we slept in an alpaca barn at Four Pines.

…or on the outskirts of town…or (with their permission) behind a local’s house?

  • We stayed at hostels when all of our items were soaked or the owners were known for being awesome.
  • If you’re in the mood to meet locals, download the app Couchsurfing and give that a go, or simply talk to people you see.
  • If a hostel lists the price of every individual service in your guide book, beware. The nicest hostel owners (I encountered) have some sort of connection to the trail. They treat you like a human being not a profit, and then encourage you to leave donation.
  • Keep an eye out for work-for-stay options. There’s potential to learn skills/apply ones you already have in exchange for a bed.

It’s nice to be treated respectfully, so make sure to respect people in turn.

If the hostel is donation-based, leave a fair donation. If someone gives you a ride to the trail and tells you their story about how they’re struggling, politely offer a few bucks for gas.

Skip restaurants and hitch to the grocery store instead.

  • Load up on both nutritious and calorie-dense food to eat right then and there. For us, it was impossible to come into town not starving, so we’d do things like split a rotisserie chicken, eat a spring mix of lettuce from the bag, bananas, fresh loaves of bread and hummus, etc.
  • In cooler weather, load up on blocks of cheddar cheese; it keeps well for a few days. At times, Lucas and I ate a 1/4 lb. of cheese a day, and it was great. In New England, cheese that’s usually pricey ($4+) can be as low as $1.80.

Mail-drops are worth it, if you have enough time to plan ahead!

1150887_452716444861252_1492527491_n

Christmas Day

About half of our resupplies came from mail-drops, which were sent to not-the-best resupply points. When I made sure to vary the food, mail-drops were like Christmas. So yeah, keep them random and exciting!

  • If you buy items in bulk, the mail-drop becomes worth it. Let’s say a box is $15 to ship, and you have 10 clif bars in it that you bought at $.80 each and a huge jar of almond butter for $7. Already, you’ve saved at least $15 versus buying it at the store off the trail, and you still have a box to fill with more items bought at discounted prices.
  • Check-out Baltimore Jack’s resupply guide. It’s on point.
  • If the mail-drops are overly planned and mostly the same, you’ll end up ditching their contents in a nearby hiker box.
  • Stick mini candies in all the box’s empty spaces, except butterfingers because the texture changes.
  • It’s nice eating the (healthy) food you like, especially when the only resupply option is a convenience store.

Have lot’s of Ziplocks at all times. 

Just trust me on this one.

In the near future, I’ll make an in-depth post specifically about gear, but for now, I hope this helps you with your planning!

Gear Review: Salewa Wildfire Approach Shoes


Photo courtesy of Salewa

Photo courtesy of Salewa

One of the most important pieces of gear for long distance backpackers are their shoes. For my thru-hike of the Appalachian Trail, I chose the Salewa Wildfire Approach Shoes. I knew that if I planned on hiking anything more than fifteen miles a day with a 25+ lb backpack, foot love was top priority. I’ll be honest, what originally attracted me to these shoes was its style; the futuristic look and bright color scheme of the Wildfires caught my eye. In fact, my boyfriend/hiking partner, Lucas, saw me checking out the different colors online and said, “Wow. I want those.”

After a bit of research, we both ordered our first pairs. I figured the shoe’s design would function well on the trail’s terrain and, long story short, it does. Untitled2

DESIGN

Although the Wildfires are an approach shoe, their sticky rubber, stiff sole, and unique ankle design serve well for long distance backpacking through tough terrain. There are many sections of the A.T. where scrambling up and down rocks is necessary, and the Vibram Tech Approach EVO sole gripped those rocks with no problem. As a rock climber (and shorter person), I appreciated the rubber toe box a lot. Instead of being forced to lunge up a section of rocky steps, I could find little toe chips and pockets to use as intermediates.

The sticky rubber also allowed Lucas and I the chance to slip off our packs and climb up boulders we saw along the trail, which is something you can’t do in a pair of traditional trail runners! 10336792_470475323085364_6745281100402170421_n

PERFORMANCE

They perform well on steep or uneven terrain, rocky descents, snow, dirt, and just about anything else. However, we did experience some slippage on mud and slick rocks, but I believe that becomes unavoidable to some extent. We purchased the shoes without Gore-Tex, and they dried overnight when laid sideways, which is important for a rainy Appalachian Trail afternoon. Lucas went the entire time without getting any blisters, giving credibility to Salewa’s “100% blister-free” claims. I, however, did acquire a tiny blister on one of my toes (it went away overnight though).

Many people use high-top boots on their hikes for the ankle support. During research, we came across theories that claimed the high-top ankle support actually weakens your body’s natural ability to stabilize itself. Since we have gone as far as we have without twisting an ankle (knock on wood), I’d say the ankle support in the Wildfires was enough.

Untitled

FIT

For six months, Lucas wore his Wildfires as his everyday street shoe. He was obsessed with the fit from the moment he took them out of the box. During our thru-hike, the shoes felt right, as if everything was how it should be in a shoe and the toe box was wide enough. That is, until our feet swelled. I made the mistake of ordering only a half size up–big mistake! I encourage you to buy a full size up from your street shoe if you intend to hike over 100 miles within a short period. Feet swelling and collapsed arches are inevitable when long distance backpacking!

Thankfully, the Wildfires are laced similar to climbing shoes, and extend far towards the toe. Again, buy your shoe that extra size up and just tighten the laces for a secure fit. Both Lucas and I found the customizable insoles interesting, but I admit that I did not take advantage of this feature because I used my own super stiff, replacement insole (which I regret). The MFF+ Footbed system is definitely something to play around with and use to create the best fit for your foot. The wider insoles and extra cushion in the heel options will help with foot swelling. We ended up re-lacing our shoes 500 miles into the A.T. because our feet widened too much.

Note: this strange method does allow the shoe to widen, but it doesn’t take advantage of the Wildfire’s unique lacing. photo 3(1)

DURABILITY

It’s not uncommon to see torn up shoes on the A.T.–seriously. Many thru-hikers sport duct tape on their shoes, or have a couple of toes hanging out the front. So, although parts of our shoes began to fall apart, there wasn’t much functional damage. Nothing that would hinder our hiking ability changed; there was no real tread wear and the toe box maintained its edge. I’m absolutely impressed with their durability!

The shoes only became less aesthetically pleasing with time. The first thing to show wear was the EXA shell that covers the bottom sides of the shoe–pieces of the beehive-like plastic began to fall off about 200 miles into our thru-hike. Next, we noticed the back and the sides of our ankle support wearing down to expose the inner foam. Luckily these changes did not effect the feel of our shoes–in truth, my heels couldn’t tell the difference. The rubber never separated from the outer fabric, and there are no holes either.
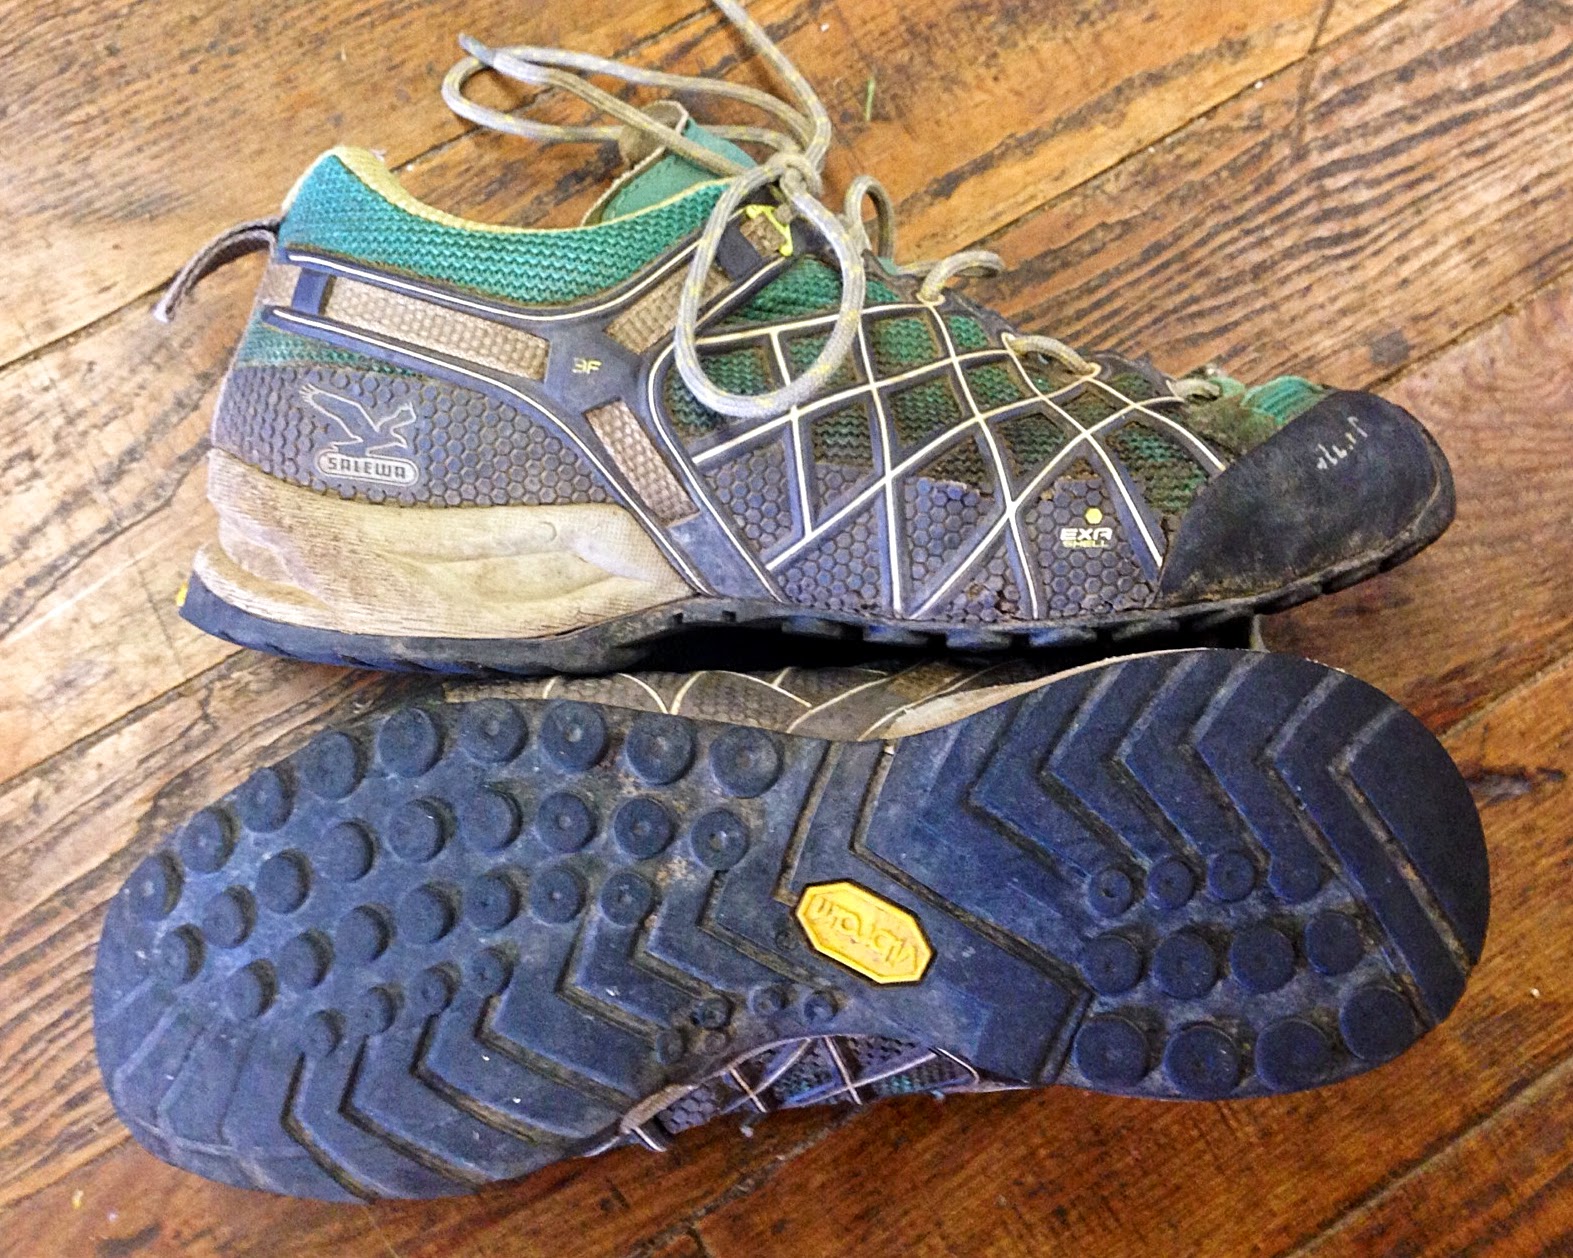
 photo 4

CONCLUSION

These shoes are absolutely superb/I highly recommend them. Wear them during a section hike, take them on a climbing trip, or sport them around town–it doesn’t matter, you’ll fall for their magical powers. If you plan on using them for a thru-hike, UP-size and enjoy! The quality of the Wildfire’s design and durability is suited for more difficult, technical hiking. This shoe makes a huge difference when scrambling over rocks. No joke, fellow hikers were envious of our gripping capabilities and asked to try on Lucas’ pair.

In the end, I wore my shoes for a little over 600 miles, and since Lucas wore his for 6 months before the trail, we guess his accumulated mileage is near 1,000. If we would have sized properly, I’d say the shoes could have easily handled 1,500 miles. Soon, we will be sporting new pairs of Firetails, which are the next model up in stiffness. We plan on walking in them all the way to Katahdin!

Gear List

Note: Lucas and I have no idea how much we spent on gear. However, we purchased most of it at a discounted price. Here’s a few suggestions on how to find deals.

  • The Clymb, Steep & Cheap, and the REI-OUTLET are good places to check regularly. Also, look in the clearance section of your local outdoor stores, and even generic retail outlets.
  • Amazon! Just make sure to watch the prices (they change often). Amazon also refers you to deals offered by other sites like Sierra Trading Post, and if you click through the colors on various items, odd colors are almost always cheaper (hence why my clothes are so bright).
  • Don’t forget thrift-stores, especially if there are outdoor related ones in your area. Lucas bought a nice Columbia fleece from Goodwill for less than two dollars.

With that said, here’s our gear list!

Image

SLEEP SYSTEM                                                                      Lucas                  Montana

General Item Specifics
Tent Tarp Tent Squall 2 (6 stakes)
Sleeping Pad Therm-a-Rest Prolite & Therm-a-Rest Prolite Plus Short
Sleeping Bag The North Face Cat’s Meow & The North Face Cat’s Meow Women
Sleeping Bag Liner Coleman Stratus Fleece & Sea to Summit Reactor Thermolite Liner

Image

PACK
Backpack Osprey Atmos 50 & ULA Circuit
Space Blanket Mylar Emergency Blanket
Pack Liner Trash Compactor Bags
Stuff Sacks Sea to Summit eVac Bag x2 and Sea to Summit eVent Compression Dry Sack x2

Image

KITCHEN
Cook Pot Evernew Ultralight Titanium 1.3 L
Stove Homemade Alcohol Stove with 8 oz denatured alcohol as fuel, & aluminium windscreen
Spork Snowpeak Titanium x2
Plate Sea to Summit Collapsible Plate

Image

Water/First Aid
Water System/Purification 2L Platypus Bladder x2 & Platypus GravityWorks
Bear Bag and Rope Sea to Summit Ultra-Sil Dry Sack & orange 550 paracord
Pack Liner Trash Compactor Bags
Knee Braces Cho-Pat Dual Action x4
First Aid Kit Ibuprofen, Medical Tape, 6 Bandages, Gauze, Benzoin Tincture, 2 gloves, tweezers, nail clippers, antihistamine, safety pins, tiny floss, thread, needle, and Iodine Tablets.
 Bug Net  Sea to Summit Mosquito Head Net x2
Pot Scrapper GSI Outdoors Compact Scraper
Toiletries In Ziplock bag – Sunscreen, insect repellent, chapstick x2, toothbrushes, small toothpaste, Bronner’s soap in 2oz bottle,  Wet Ones, gold bond, petroleum jelly, and hair ties.
Mirror Coghlan’s Feather Light Camping Mirror Survival

photo 1 (1)

CLOTHES
Shoes Salawa Men’s & Women’s Wildfire, Superfeet Blue Premium Insoles, $10 croc-offs from Walmart, and Women’s Vibram Five Finger   
Pants Target Champion pants & Outdoor Research Women’s Voodoo Pant
T-shirts Target Champion shirts x2
Socks Injinji toe sock liners x4, SmartWool Lightweight Hiking Socks x4, and SmartWool Mountaineering Extra Heavy Socks x2 as camp socks
Longsleeve Minus33 Merino Wool Turtleneck & SmartWool Zip-up
Rain Gear The North Face Venture Rain Jacket Hyvent & Women’s Marmot Precip Rain Jacket
Jackets ExOfficio Storm Logic Jacket, Scott Synthetic Down Jacket, and Columbia Fleece jacket x 2
Misc. Fleece Gloves x2, Minus33 Merino Wool Cuff Beanie, Polyester Hat, Minus33 Merino Wool Midweight Balaclava, 3 Bandanas/buffs x2, and Brimmed Hats x2
BaseLayer Tights Minus33 Merino Wool Leggings & Columbia Women’s Baselayer Tights
Underwear Men’s ExOfficio Boxers x2, Women’s ExOfficio Boy Cut x2, and Polyester Bras from Target x2
Shorts Billabong Boardshorts & Columbia Cross On Over Cargo Shorts

photo (16)

MISCELLANEOUS/ELECTRONICS
Headlamps x2
Knifes Morakniv Companion Knife & Razor Blade
Notebooks Moleskin Soft Notebook Large & Volant Large x4 pens
Electronics

PowerGen 6000mAh charger, Sansa Mp3 player, x2 headphones, water resistant watch, and cords

Phones/camera Iphone 5 & LifeProof Case/Motofone f3

Final Notes:

  • Montana’s backpack baseweight is about 16lbs and Lucas’ is 19lbs.
  • Our tent uses trekking poles to prop it up, and only weighs 2lbs. Best. Investment. Ever. Check-out TarpTent.
  • There are great quick-dry clothes at Target. We even bought a water-resistant watch on sale for $10, aka our alarm clock.
  • For the ladies with back pain or Scoliosis, Target also has quick-dry bras (not sports bras) that feel fantastic.
  • Columbia fleece jackets last forever. I’ve had a boy’s fleece for seven years. It has survived everyday use, numerous rock climbing & camping trips, summited a mountain, and more. No snags, no holes–it’s perfect.
  • Cho-Pat Dual Action Knee Braces are great for crummy knees. Seriously. Get these babies if you experience discomfort or pain. I’ll write a review soon.
  • We’ll mail our cold weather gear back home around Damascus, VA, so our pack weight will drop a few pounds.

And that’s just about it!

We start our thru-hike in less than a week. I hope we don’t have to send things back at Neels Gap! (;

Thru-hiker Trail Mix

3 weeks from now, Lucas and I will be camped somewhere along the trail! I look forward to the end of the planning process–I can’t wait until we stand atop Springer Mountain, prepared and ready for 5 months in the woods. It’s kind of stressful balancing calories per gram…and my checking account.

As of now, we plan on resupplying from 18-20 mail-drops (and buying the rest from grocery stores). There are plenty of outfitters, hostels, and post offices along the Appalachian Trail that will hold our packages until we make it to town. We have chosen to mail food to ourselves when resupply stores are inconvenient. Also, we want to eat clean food during our thru-hike, and buying ahead of time has allowed us to stock-up for cheap from Sam’s Club and Trader Joe’s (amazing deals for organic/natural options).

Below are pics of our current food endeavor: preparing homemade trail mix! 


There are three easy steps to making simple, semi-raw mixes.

Step 1: 

Buy nuts, dried fruits, and whatever looks delicious/high in calories. Chow Mein noodles are a surprisingly good touch to trail mix. And dark chocolate is always a good idea.

Step 2: 

Get a brown paper bag, pour the above into the bag, and then shake it. If you want, you can measure out each ingredient to the right amount, or just eyeball it like I did (I added nuts and what not until the mix looked like the stuff you’d see at a store).

Step 3: 

Measure out servings and then package it in ziplocks or vaccum seal bags.

Lucas will have approximately 3/4 to 1 cup of trail mix a day and I’ll have 1/2 to 3/4 cup. We’re not sure how many calories are in each serving, however, most of the ingredients are 5+ calories per gram…so that’s about 750-950 calories a cup. 

EASY PEASY and cheaper than buying premade mixes!

Appalachian Trail Food

Many thru-hikers use the AT as an excuse to gorge on anything light, tasty, and oh-so bad for your arteries. Lucas and I both know that we function optimally on clean, low-glycemic foods. Below is our list of healthy hiker grub.

photo (3)

Breakfast: Even a life of get-up-and-go needs a little routine. We plan on boiling water for coffee and oatmeal in the morning, with granola or trail mix thrown in. Warm liquid to slurp and hot food seems like a good way to get our minds ready for another day of carrying 20+ pounds through the woods.

In case we wake up in a rainstorm and want to munch on the move, we will also eat

  • Bars (see list below)
  • Toaster pastries

Snacks: About half our daily calories will come from snacks.

  • Bear Valley Pemmican Bars
  • Skout Organic Trailbars
  • Nugo Organic Bars
  • Variety of other whole grain/high protein bars
  • Homemade trail mixes (a lot of our calorie intake relies on this!)
  • Homemade dried fruit: banana chips, apples, pineapple, mango
  • Almond and Peanut Butter
  • Cookies
  • Dark chocolate
  • Beef Jerky
  • Tortilla and Pita chips

Lunch: Around midday we will take a longer, hour-long rest. We’ll eat our lunch along with the snacks mentioned above.

  • Almond/peanut butter with tortillas
  • Bagels w/ Nutella
  • Dehydrated hummus with crackers
  • Dried cheese with crackers or tortillas
  • Tuna in foil packets

Dinner: We plan on eating a warm, stick-to-your-ribs dinner each night. If it is raining, we might settle on “lunch” foods. For extra calories, we’ll add sporkfuls of coconut oil or olive oil.

  • Instant soups (miso, black bean, chicken, or lentil)
  • whole wheat angel hair pasta, Parmesan cheese, and jerky
  • Mac and Cheese with tuna or jerky
  • Instant mashed potatoes
  • Stove Top Stuffing
  • Quinoa and dehydrated beans

Drinks:

  • Hot chocolate
  • Tea
  • Ground coffee (cowboy style)
  • Apple Cider
  • Gatorade
  • Emergen-C

For more information on how we picked specific foods, check out Backpacking Nutrition.

Backpacking Nutrition

On average, Appalachian Trail thru-hikers burn about 4,000-6,000 calories a day. Our goal is to eat the amount of calories required, as well as pick the most nutritious, calorie-dense, delicious, and affordable options. We’ve also decided to schedule mail-drops rather than purchase our food from local grocery stores, mainly because it is cheaper to buy in bulk/ahead of time (in small towns off the trail, a pack of Ramen can be $1 a pack!). I admit, it has been slightly overwhelming to plan our food for the next five months–who knows how long it will take for us to tire of trail mix–but I believe that variety is key to a happy hiker stomach.

After reading the NOLS Cookery book and various websites, I have determined that I will require approximately 4,000 calories a day, while Lucas needs about 6,000. I have also concluded that a diet consisting of 50% carbohydrates, 35% fat, and 15% protein is ideal for our daily hiking mileage and trip duration. Fat is the most calorie-dense food, so a diet high in fat allows us to reduce our pack weight while maintaining our high calorie count. It is important for us to be aware of our consumption of non-nutritious foods while thru-hiking. Although Poptarts provide a high amount of carbohydrates and fats, they do not contain sufficient nutrients and minerals needed to function optimally (not to mention, they’re highly processed). Therefore, we will take a multivitamin, carry Emergen-C packets, and try to eat as healthy as possible.

Here’s the equation I used to determine how much food I will carry per day:

(4000 calories/person/day) ÷ (120 calories/oz) ÷ (16 oz/lb) = 2.08 lbs/person/day

20140123-164143.jpg

organic bars, 4 cal per g, and just 41 cents a bar!

Using the NOLS Cookery book, here’s our daily food allowance in percentages:

  • Breakfast = 15%
  •  Lunch and Snacks = 50%
  •  Drink mixes = 5%
  •  Dinner = 25%
  •  Desserts = 5%

I used these meal percentages to determine how many grams we can carry of each (Yes, GRAMS. Lucas bought a scale… the scientist in him wants us to be as accurate as possible). For example,

(2lbs of food/person/day) x (0.15 breakfast food) =0.3 lbs (136.2g) of breakfast food/person/day

Using this formula, I have determined that I will eat 1lbs (454g) of food for lunch and snacks, 0.1lbs (45.4g) of drink mixes, 0.5lbs (227g) for dinner, and 0.1lbs (45.4g) of desert every day.

Phew! Now that the math part is out of the way, next time I’ll discuss the actual food we will carry.